

How To Disable Macbook Camera
Last Updated on February 12, 2022
Are they wondering about the mac or m1 mac internal or external camera not working for every application, including FaceTime, Google Meet, Zoom, Microsoft Teams, etc.? Apple MacBook and iMac have an excellent built-in camera that enables you to connect with your colleagues, friends, a family using FaceTime, Skype, Facebook, and more. Recently, users study that their Mac camera is not working afterwards the update, Mac camera not working zoom, mac camera issue google encounter, mac Camera Non working on Microsoft Teams, or Mac photographic camera won't work in a Facebook video call.
we are happy to help you lot, submit this Class, if your solution is non covered in this article.
In more, many more issues encountered with Mac's Photographic camera with your MacBook Models "MacBook Pro 2020, MacBook Pro 2019, MacBook Pro 2018, MacBook Air, MacBook Pro 2010, 2011".
So after looking at all of these bug, we have made a full-proof list of potential solutions that can quickly prepare every reported bug.
Besides Read, Fixed "At that place is no connected photographic camera" Error with a Mac
fourteen Fixes Workarounds will help y'all to fix Camera Won't work on Mac: MacBook Pro, MacBook Air, iMac
Listed solutions likewise utilize to correct errors included Omagel Mac photographic camera not working, Mac Camera non working, Skype or Camera no continued.
Besides read-
- How to Tell if Your Mac Camera has been Hacked
Principal Check:
Is Your Mac Camera Restriction On?
All macOS Version has robust Parental control from an older time. So, nowadays, MacOS Comes with Screen Time restrictions control. So, allow's take check-in details and Enable Internal Camera Employ from screen fourth dimension if blocked. And then, follow the Below steps and Plow on Mac, MacBook camera for use installed Mac app or Third-Political party Video Calling, Meeting Apps, or Browser.
- Click on the Apple Logo from the top Mac carte > Arrangement Preferences > Screen Time > Content & Privacy from the left side of the window > And Click on Apps Tab > Enable Check box for Camera. That's it.

At present, also follow the App and Browser lever camera restrictions if it'southward enabled. Typically, the Photographic camera is blocked nether the screen time, and then You can't see the camera pick under privacy showing in the next check.
Cheque Mac Photographic camera Privacy for App & Browser
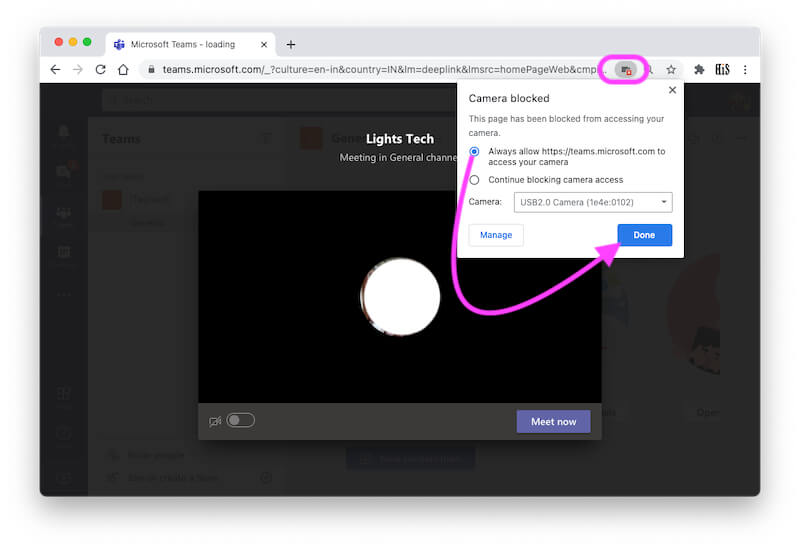
Now, yous have to allow the app and Browser to use your Mac Internal or External camera. To reach out to this setting, Open the Organisation preferences from Summit Apple Logo on the Mac bill of fare > Click on Security & Privacy > Camera > And Select the App to Allow Camera access [Unlock the lock to apply changes].

Additionally, Most of the Video Calling platforms and Meeting platforms like Zoom, Webex, Google Meet, Microsoft Teams are bachelor Spider web-based. So that users tin access it from the Browser, and Users have to enable From the Browser's address bar, here'south below the screen, to allow Camera access within Browser.
Also, Google Chrome users have to enable "Use hardware dispatch when bachelor" from Browser settings; in new Tap, enter: chrome://settings/system in the Address bar, and then Hit the enter.
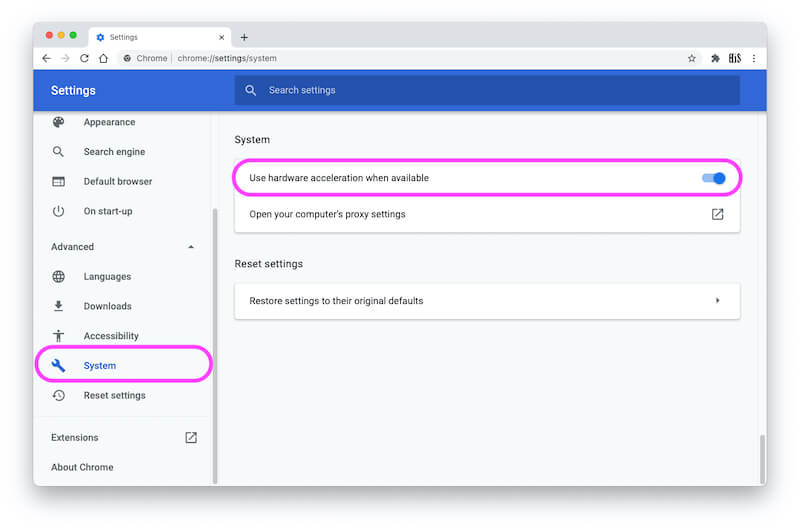
You will see, Use hardware acceleration when available, enable the toglge and Re-launch the browser. Now Your Browser can use more resources and RAM when requires.
Let'due south Leap into deep solutions one past one,
Solution 1: You should Restart Your Mac
Restarting Mac can fix the Camera not working on Mac if the problem is minor. It is often found that this technique resolves undoubtedly every issue. In case your Mac problem may, though, and then continue you lot to the next inkling without worrying.
- Click on Apple tree Logo () From Top Mac Card.
- Click on Restart, Hope it will fix subsequently Restart your Mac.
- However not stock-still then follow the next solution.
Solution ii: Potential Quick Fixes to get rid of Mac Photographic camera Won't Piece of work.
For you, if rebooting Mac doesn't work, then there are many solutions available to fix the Photographic camera non working after the update.
- #1: Try using another application on your Mac similar PhotoBooth, iChat. This, y'all will come to know that the Photographic camera is not working in facetime only, or the result is more than prominent.
- #2: Another troubleshoots is to log in with a unlike username if it works then the trouble is with Apple ID.
- #3: Remove the camera and FireWire cable from Mac and re-plug afterward few minutes to see if the Mac photographic camera is not working on Skype.
- #four: FaceTime camera is not working on MacIf. The issue is specific with FaceTime, then it might be possible that MacBook's Camera got stuck on a built-in camera and unable to choose the display photographic camera. Let's gear up FaceTime photographic camera not working in macOS Mojave
- Step #1: Open "FaceTime" in Mac.
- Footstep #ii: Become to "Menu" and click on "Video."
- Step #3: Choose "FaceTime Hard disk drive Camera (Display)"
Solution 3: Applysudo killall VDCAssistant Control
- Step #one: Close every open tabs or App that uses Mac's Camera similar FaceTime or Skype.
- Step #2: Open "Terminal" directly from Spotlight.
- Stride #3: Enter the given control line,
- sudo killall VDCAssistant
- Step #4: I more than fourth dimension enter code in the final,
- sudo killall AppleCameraAssistant
- Step #5: Insert the Authoritative password and keep farther.
- Step #half dozen: Re-launch the FaceTime or Skype or whatever App which you lot were using.
NOTE: if you are entering both the commands in a single line, and so you have to follow this syntax:
sudo killall VDCAssistant;sudo killall AppleCameraAssistant
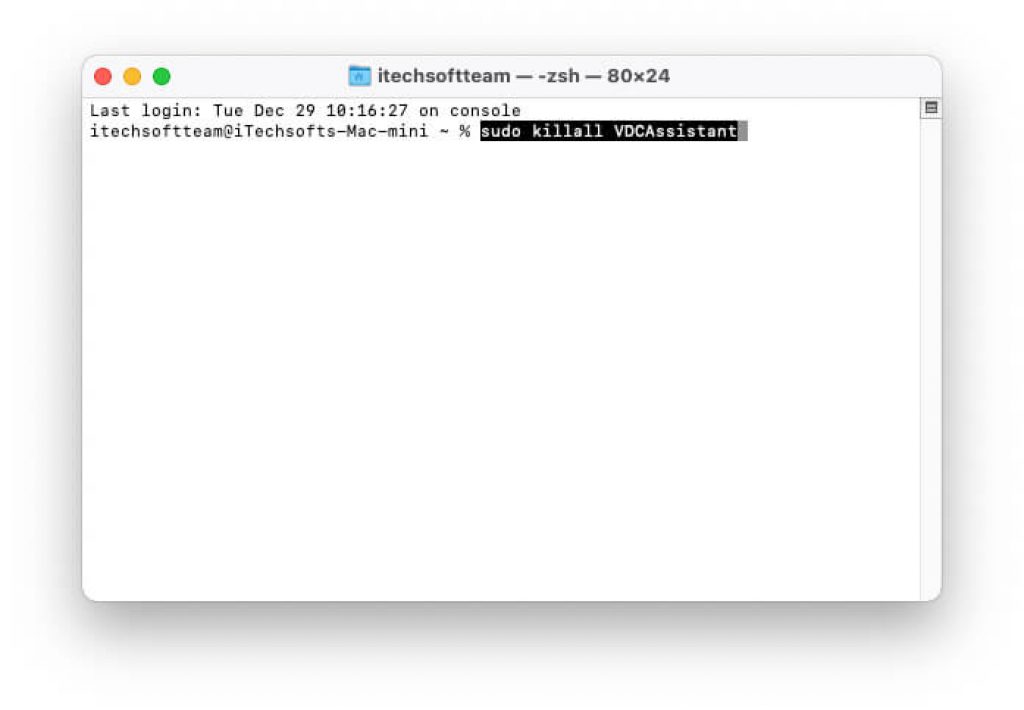
Enter the admin passcode and consummate the process.
Solution 4: Use Activity Monitor App [Worked]
rswc90 said this solution is worked for him.
Until now, you cannot fix the Mac photographic camera not working on a Facebook video call, and then our last option is force closing the process from the Action Monitor.
- Step #1: Close the Applications which needed a photographic camera like PhotoBooth, FaceTime, or discord.
- Pace #2: Open the "Applications" and then click on "Utilities Binder."
- Step #3: Side by side, open up "Activeness Monitor."
- Step #four: Click on "Procedure Proper name," it will organize the list in alphabetical lodge.
- Step #v: Locate "VDC Assistant" and click to open up information technology.
- Footstep #vi: Now, click on (X), which is located on the top left corner, and close the plan.
Solution #5: Check for Software Update
The onetime version of software sometimes lacks some Mac function, so kindly check for updates and update if any are available. Apple is continuously giving a free update with some bugs fixed. On Your Mac, you tin can enable automatic download software updates or Do it manually by following these steps. Get-go, go to the Apple tree logo on Mac > System Preferences > Software Update [Wait for Check information technology] if any update is bachelor, then download it first and install.
Solution #half dozen: Remove or Disconnect all Tertiary-Party Peripherals
Disconnect all third-party accessories from your Mac organisation. That might be Bluetooth Wireless or Wired connection. Smart Bluetooth System of Mac automatically connects your Homekit accessories like Wireless bluetooth webcam for Mac; that's what nosotros don't know in nigh cases. If bluetooth is not in use, then Turn off bluetooth under the System preferences [ Apple tree logo from top right mac carte du jour bar > System Preferences.. > Bluetooth > Plough off Bluetooth or Remove all bluetooth Devices manually] or From superlative mac carte du jour.
Solution #7: Reboot your Mac in Rubber Mode
Try A safe fashion that detects and fixes all isolated problems on your Mac'south startup disk. This way loads only the kernel extension of your mac. That delete font caches, Kernal caches, and Other organization cache files. So we can place the problems if the previous macOS is creating matters like this. Safe fashion is not helpful to apply your Mac because this mode will disable some mac functionality like accessibility features, File sharing, USB functionality, etc.
To put your Mac in safe mode, Restart your Mac, Go to the Apple logo on the Mac menu > Restart option from Dropdown.
On Apple Silicon M1 Mac:- Turn off your Mac, Press and Hold Power central [Touch ID Push button], Until you run into Startup Book and Options, Press Shift Cardinal and Click on Startup volume > Now, Click on Login with Safe mode. Log in to your Mac and check the issue if fixed.
On Intel Mac:- Next, press and hold the SHIFT KEY from your Keyboard later on your mac play startup sound . Release after your Mac show Mac login screen and Safe more characterization at the superlative right corner of Mac's screen. Now cheque your Camera is working fine.
If it's working, you should repair your Mac drive or Reinstall/Clean install macOS because it's a problem with the Bone. The photographic camera trouble is non fixed in safe mode, then your mac'due south photographic camera hardware bug or software issues as well.
Solution #viii: Create a New User Business relationship: Try in New Account File System
Suddenly your mac has issues with the Camera; You have no time to Repair your Mac drive or Reinstall/Clean install macOS. I recommended creating a new user business relationship on your Mac. I solved many problems when some 3rd-party software is creating the macOS file system. Create an administrator account in the same mac. Go to the Apple tree logo on the Mac card > System Preferences > Users & Grouping > Click on lock to Unlock and add a new account > Now Click on + Sign to Add together new business relationship > Select a User role from DropdownDropdown [Administrator] ,
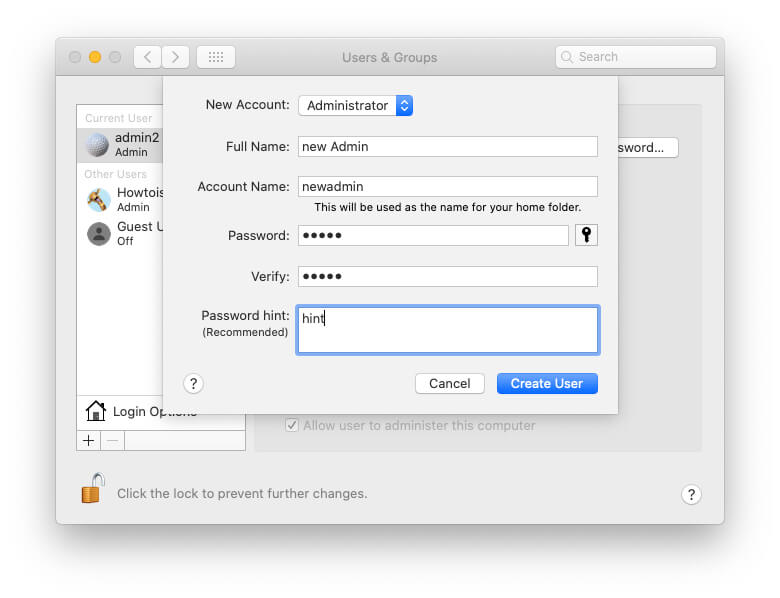
Give a name, Enter the countersign, and finally click on Create User. That's it. Now Restart your Mac and login into some other account to check your issues are fixed or non.
Solution #9: Repair Deejay No Data Loss and Quick
Nosotros tin can repair your Mac Drive without reinstall mac Os and Remove user data from Mac. First Help takes activity on a particular MacOS disk sectionalization if your Mac is running dual boot macOS. Then we need to open Disk Utility on your Mac. Utilise Spotlight Search [Command + Space] and try Disk Utility or Open it from the launchpad. One time information technology option, Select your macOS drive partition, At present Click on First Aid option from acme tab > Click on Run button to run Fist Aid on Selected macintosh Hd Drive.

Some macOS problems can't resolve the First Assist disk repair pick. And then, you could fix using the installed macOS. This process will download and install the latest version of macOS. Follow the next solution.
Solution #ten: Reinstall a Re-create of macOS To Fix Camera bug
The reinstalling macOS in the Recovery fashion on Mac, process overwrites the existing file and replaces corrupted files and folders. Also, your Mac is updating the latest macOS version; and so, you lot must effort this solution. Before starting, your Mac has an active cyberspace connection Because your Mac download macOS file during installation. Now, Restart your Mac [Go to the Apple logo on Mac > Restart ].
On Apple Silicon Mac [M1]:- After a expect for x seconds, Press and Hold the power push [Touch ID Button] until you come across the startup volumes and Options > Select "Options" > At present, your Mac plough into Recovery mode > Select Reinstall Mac from macOS Recovery screen.
On Intel Mac: After mac play, startup sounds quickly press and hold command + R fundamental from the Keyboard. Until your Mac screen shows the macOS utility window on the screen. Now the second option in a window is reinstalled macOS.

Go with this choice and follow the on-screen education. In this process, you lot take to select the mac drive that you want to repair or reinstall.
Solution #11: Install a New copy of macOS subsequently Erase Drive: Clean install macOS
[This process doesn't require a bootable USB drive of macOS] The make clean install process is also easy and not time-consuming; I highly recommend fixing all types of software problems that are afflicted by the Bad file arrangement, Install 3rd-Party software, Slower mac, and more. Before starting this process, Keep a backup of your all-important Data from your Mac to an External Drive or Use the Time Machine Fill-in process.
- Restart your Mac [Apple tree logo from summit Mac bill of fare > Restart ]
- Apple Silicon Mac[M1]:- Subsequently wait for 10 seconds, Press and Hold the Power button [Impact ID Button] until you see the Startup volumes and Options on screen, Click on Options and Find the MacOS utilities in macOS Recovery mode. Intel Mac:- Apace Printing and Hold command + R keys from the Keyboard after listening to startup sound from your mac. Release Keys after yous run across MacOS utility windows on the Mac screen.

The terminal option on macOS utility windows is the Disk utility. Click on information technology. and Select the Drive from Sidebar, And click on Erase pick from the meridian.


Solution #12: Photographic camera Allow to Access past 3rd-Party Software
Your MacBook Camera privacy settings are preventing the utilise of a third-political party app or software installed on Mac. So on Newer macOS, you volition find these settings under the Macbook system preferences.
Goto system preferences > security & privacy > privacy > photographic camera , click the checkbox for assuasive apps like google chrome to access the Camera.
Solution #13: Apply iSight Camera
In today's market place, you lot have a expert quality USB external Camera that yous tin can use any system similar Mac, Windows, or Laptop. But, if your MacBook cannot wake up the Camera and Your Mac is too quondam, you can't get costless service from the apple store. Moreover, the repairing toll is very high in this case. Then I recommend purchasing an external USB camera with Microphone.
Solution #fourteen: Camera Hardware problem
Any of the above solutions are not useful for y'all. And then sorry for the inconvenience. Now the Showtime cheque your MacBook is under warranty period and new that was recently purchased. Then don't waste matter much time, fifty-fifty one 24-hour interval. Because under warranty menstruation, you will go free service from apple sore or replacement in some cases later on analyzing your Mac at the nearby app shop.
You can also contact online support [Select your land and Device] to volume your genius bar engagement or Get an official Apple tree repair program agile for your Macbook Model.
No Camera Available on MacBook Pro
While working from home, we need Mac's Camera the most for conferences or client meetings. What if MacBook shows no camera available? You don't have to worry about Mac'southward inbuilt Camera; check the post-obit solutions, and fix the problem.
Solution 1: Force Quit VDCAssistant & AppleCameraAssistant
VDCAssistant and AppleCameraAssistant are necessary background process that accelerates and helps the inbuilt Camera of MacBook to work. Using the Terminal App, you tin can kill the Camera and once you do, all the camera applications like Skype, or Mac's Photographic camera itself, turns off for once.
- Launch the Last App, from the Spotlight search (cmd+space).
- Type the following code in Concluding App,
- sudo killall VDCAssistant and hit return.
- If asked, and so enter the password.
- Similarly, type,
- sudo killall AppleCameraAssistant and press return key.
Now, try to use MacBook Pro Camera and check if the trouble persists.
Solution 2: Make Sure MacBook'south Congenital-In Photographic camera is Selected as Primary Photographic camera
Yous can bank check for the primary Camera from specific applications like Skype, FaceTime because there is no standard settings option available from the Mac. So after going to the settings of a particular app, it can only be done from where the Camera is not working on Mac, and choose a born photographic camera.
There is no Connected Camera on MacBook Air.
What you can practice when there is no continued camera on MacBook Air is restart the Mac and the Mac Camera Non Working application.
- Restart MacBook, to practise so, click on the Apple menu and cull Restart.
If this doesn't work, and then check the next one.
- Press Opt+Control+Esc and select an application similar Skype, FaceTime, and click on Close.
Become a Detailed guide on No Video, Face Fourth dimension Has Non Received Whatsoever Video From the Continued Camera.
Is Your Mac Photographic camera Fixed? Don't Miss out on sharing the success way in the comments!

Source: https://www.howtoisolve.com/fix-camera-not-working-on-macbook-pro-air/
Posted by: fergusonwitiou.blogspot.com
0 Response to "How To Disable Macbook Camera"
Post a Comment